American Revolutionary War · Evidence-led battle guide
Battle of Mount Holly
The Battle of Mount Holly, also called the action at Iron Works Hill, was a three-day sequence of skirmishes in Burlington County from December 21 to 23, 1776. Samuel Griffin’s small militia force repeatedly withdrew before Carl von Donop’s much larger Hessian detachment. Tactically the Crown troops drove the Americans from successive positions and occupied Mount Holly. Strategically, however, Donop’s movement placed a substantial Hessian force well south of Trenton on the eve of Washington’s attack there, which is why the episode matters far beyond the number of shots fired.
Quick answer
What happened at Battle of Mount Holly?
Griffin’s militia did not hold Mount Holly. It used a series of delaying positions, including Woodlane and Iron Works Hill, before withdrawing as Donop’s larger force advanced into the town.
Why it mattered
The action drew Donop’s detachment away from the Trenton garrison during the days immediately before Washington crossed the Delaware. The exact degree to which this diversion enabled Trenton is debated, but the displacement of the force is operationally significant.
Visual evidence + analytical reconstruction
See the Battlefield, Not Just the Summary
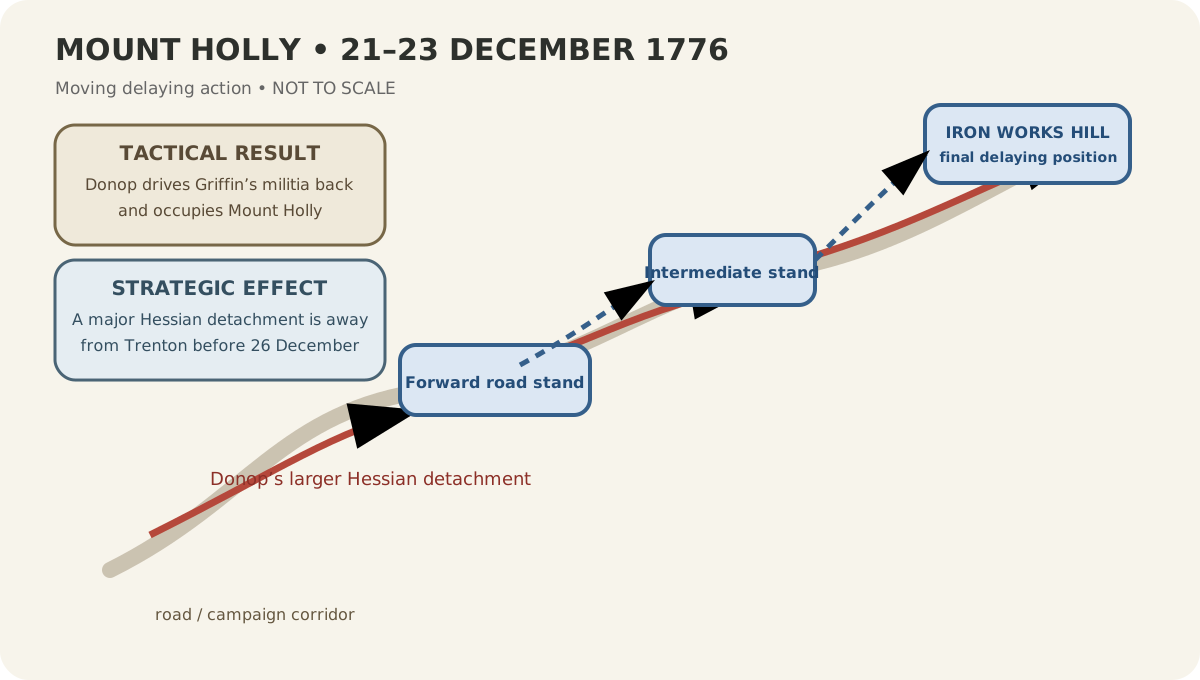
Mount Holly delaying-action corridor schematic
Bellum schematic shows a moving sequence of stands rather than a fictitious single battle line. Not to scale.
BellumReport Research Desk · Original 2026 analytical graphic · Bellum original graphic
Rights: Original explanatory graphic; not a surveyed map.
.JPG)
Mount Holly Historic District landscape reference
Modern rights-reviewed place image. It is not presented as a 1776 battlefield photograph; the tactical schematic and sourced geography records carry the historical interpretation.
Commons contributor · modern photograph · Wikimedia Commons
Rights: Creative Commons / see source record
Visual-method rule: Bellum analytical schematics are explanatory reconstructions, not surveyed maps. Historical images retain their own source and rights notes so illustration is never presented as direct eyewitness evidence.
Operational geography
Campaign Movement Map
A proportional campaign overview using each battle record’s modern reference coordinate. It explains operational movement; it is not a surveyed reconstruction of 1776 unit positions.
- Battle of Kip’s BayBritish victory
- Battle of Fort LeeBritish victory
- Battle of Mount HollyCrown tactical success; American strategic diversion
- Second Battle of TrentonAmerican defensive success
Campaign sequence
Where This Battle Fits in Its Campaign
Then & now
Battlefield Geography — Historical Ground in the Modern Landscape
Modern reference points are kept separate from claimed 1776 troop positions. A monument, park or surviving house can orient the visitor without proving that a specific unit stood on that exact modern spot.
Iron Works Hill
1776 reference: Final Mount Holly delaying position
Modern reference: St. Andrews Cemetery / Iron Works Hill area, Mount Holly, NJ
American Battlefield Trust identifies Iron Works Hill as the site of Griffin’s second and final stand.
Location confidence: HighMount Holly town center
1776 reference: Mount Holly settlement occupied by Donop
Modern reference: Mount Holly Historic District, NJ
Modern place anchor showing the town context; not a specific 1776 unit position.
Location confidence: MediumSource-traceable command structure
Interactive Documented Order of Battle
This tree shows the documented core, not an invented complete roster. Search by formation, commander or battlefield role; expand a row to see source scope, strength basis and disposition. Omitted formations remain unresolved rather than silently classified as absent.
American
CommandGriffin’s militia forceCommand: Samuel GriffinHigh
Documented strength: 600 people (ABT forces-engaged estimate)
Battlefield role: Small mobile American force operating in Burlington County.
American Battlefield Trust — Mount Holly / Iron Works Hill · High confidence
DetachmentForward skirmish partiesHigh
Battlefield role: Used bridges, roads and short stands to slow Donop’s advance.
American Battlefield Trust — Visit Iron Works Hill · High confidence
Crown
CommandDonop’s Hessian detachmentCommand: Carl von DonopHigh
Documented strength: 2,400 people (ABT forces-engaged estimate)
Battlefield role: Crown force sent south against Griffin’s militia.
American Battlefield Trust — Mount Holly / Iron Works Hill · High confidence
Regiment42nd Regiment of FootHigh
Battlefield role: British infantry element associated with the Mount Holly operation.
American Battlefield Trust — Mount Holly / Iron Works Hill · High confidence
DetachmentHessian jägers and grenadier elementsCommand: Hessian subordinate officersHigh
Battlefield role: Screened and pressed the American delaying positions during the advance.
American Battlefield Trust — Mount Holly / Iron Works Hill · High confidence
Read behind the narrative
Primary Source Room
Primary evidence is powerful but not self-interpreting. Each item is paired with why it matters and what it cannot establish by itself.
Johann Ewald’s account of the Mount Holly operations
Creator: Johann Ewald
Why it matters: Ewald’s account is central to reconstructing the Hessian movement and to understanding why later writers connect Donop’s detachment with the vulnerability of Trenton.
Read with caution: Ewald wrote from one military perspective and later interpretations differ; casualty and strategic-causation claims need comparison with Donop and American evidence.
Objectives Before the Battle
American objective
Griffin’s militia sought to harass the Crown outposts, encourage local resistance and draw attention southward without accepting destruction by a much larger Hessian force.
British / Crown objective
Donop intended to suppress the militia threat, secure the Burlington County corridor and prevent a growing local force from threatening the extended Crown garrison network.
Why a Small Burlington County Fight Belongs in the Main Campaign
Mount Holly is easy to omit from a short Revolutionary War timeline because it did not involve Washington’s main army and did not produce a decisive battlefield clash. That omission hides the network problem facing the Crown garrisons in December 1776. Trenton, Bordentown and other posts were connected by roads and mutual expectations of support. A threat to one part of that network could change where troops were located elsewhere.
Samuel Griffin’s militia could not defeat Carl von Donop’s detachment in a conventional battle. Its significance came from provoking movement. Donop took a large force south toward Mount Holly, away from the Trenton garrison. This does not prove Griffin intentionally “won Trenton” for Washington, but it does make Mount Holly a campaign-level event whose strategic weight exceeds its local tactical scale.
Evidence basis: American Battlefield Trust — Mount Holly / Iron Works Hill
Mount Holly Was a Sequence of Stands, Not One Neat Battle Line
The fighting developed over several days and locations. Griffin’s men used roads, crossings and rising ground to contest Donop’s advance, then withdrew before the Hessians could bring overwhelming strength to bear. Petticoat Bridge, Woodlane, Slab Town and Iron Works Hill belong to a moving action rather than a single fixed front.
Bellum represents the battle as phases for this reason. The tactical schematic shows arrows and successive defensive positions instead of drawing two armies facing each other across one field. That visualization better matches the military problem: a small force exchanging space for time while a larger force repeatedly deployed and pressed forward. The Americans lost each piece of ground, but the sequence kept Donop moving in the direction Griffin wanted him to follow.
Evidence basis: American Battlefield Trust — Visit Iron Works Hill
Samuel Griffin’s Illness Complicates the Heroic-Diversion Story
Later storytelling can make Griffin look like a commander executing a perfectly controlled deception. The evidence is messier. Specialist research notes that Griffin became ill and that correspondence among American officers reveals uncertainty about his ability to sustain the operation. His militia was inexperienced, and support was a real concern.
That uncertainty makes the episode more interesting, not less. Strategic effects do not always require a flawless plan. A local militia threat could attract a stronger response even when its own commander was sick and its tactical prospects were limited. Bellum therefore avoids writing the Mount Holly page as if every movement was designed in advance to support Washington’s crossing. The result was advantageous to the American campaign; the exact degree of intention remains a historical question.
Evidence basis: American Battlefield Trust — Samuel Griffin
Donop’s Decision Must Be Judged with the Information Available to Him
After Trenton, it is tempting to say Donop obviously should have stayed close enough to reinforce Rall. That is hindsight. Before December 26, the Crown commanders faced scattered American militia activity, uncertain intelligence and an extended line of garrisons. Donop had to decide whether Griffin represented a minor nuisance or a threat that could grow if ignored.
Moving south solved the local problem. His force pushed the militia out of successive positions and occupied Mount Holly. The strategic cost appeared only when Washington attacked somewhere else. Bellum’s Decision Explorer therefore separates the local outcome from the later consequence and asks what information Donop possessed before the Delaware crossing became known. This prevents analysis from turning every unsuccessful strategic result into an obvious personal blunder.
Evidence basis: American Battlefield Trust — Mount Holly / Iron Works Hill
The Casualty Numbers Are a Case Study in Historical Uncertainty
Mount Holly is exactly the kind of engagement where a polished website can become less trustworthy by showing one crisp number. American Battlefield Trust publishes modern estimates, while its own detailed narrative discusses very different claims associated with Ewald and Donop. Those accounts cannot all describe the same losses in the same way.
Bellum preserves the modern estimate as a source-specific record but marks its confidence low and places a conflict notice beside the chart. The evidence matrix then shows the disagreement rather than hiding it. No average is calculated. A mean of incompatible casualty claims would have mathematical neatness and historical meaninglessness. This approach is intended as a model for other poorly documented skirmishes as the database expands.
Evidence basis: American Battlefield Trust — Mount Holly / Iron Works Hill
Iron Works Hill Is the Best Modern Anchor, Not the Entire Battlefield
American Battlefield Trust identifies Iron Works Hill, associated with St. Andrews Cemetery, as the place of Griffin’s second and final stand during Donop’s push through Mount Holly. It gives visitors a tangible point from which to understand the action. But the December fighting extended along a corridor of roads and intermediate positions.
The Then & Now panel therefore treats Iron Works Hill as a battlefield anchor rather than a polygon claiming to contain every shot fired from December 21 to 23. This distinction is important for preservation and travel content. A visitor can stand at a meaningful place without being told that the whole engagement occurred inside the modern site boundary. Bellum’s geography table records both the anchor and the broader town context.
Evidence basis: American Battlefield Trust — Visit Iron Works Hill
How Much Did Mount Holly Matter to Trenton?
The strongest defensible statement is that Donop and a substantial detachment were away from Trenton when Washington attacked Rall on December 26. That fact changed the distribution of Crown strength in the region. It is also reasonable to say that Griffin’s activity helped draw Donop south and gave him reasons to remain there.
A stronger claim—that Mount Holly by itself caused the American victory at Trenton—requires more than the evidence can carry. Washington still had to cross the Delaware, march through severe weather, coordinate his columns and defeat the garrison. Bellum therefore labels Mount Holly a strategic diversion with potentially important consequences while resisting a monocausal story. The battle comparator can show this distinction directly: local Crown success, broader American benefit.
Evidence basis: American Battlefield Trust — Mount Holly / Iron Works Hill
Why the Result Line Needs Two Different Answers
Who won Mount Holly? On the ground, Donop did. His larger force drove Griffin’s militia from the positions it chose to contest and occupied the town. At the campaign level, the movement helped place Crown troops away from the point Washington struck days later. Calling the engagement simply an “American victory” erases what happened tactically; calling it only a “British victory” erases why historians care about it.
Bellum therefore uses the result label “Crown tactical success; American strategic diversion.” This is not indecision. It is a deliberate separation of analytical levels. Battles can produce one tactical outcome and a different strategic effect, and the database schema has separate fields for exactly that reason.
Evidence basis: American Battlefield Trust — Mount Holly / Iron Works Hill
Mount Holly Shows Why Outposts Must Be Studied as a Network
The Crown occupation of New Jersey depended on separated garrisons that could control roads, collect supplies, intimidate opposition and support one another when threatened. This system covered territory efficiently only while the posts remained mutually useful. A disturbance on one part of the line could pull troops away from another, and militia activity could force commanders to respond even when Washington’s main army was not present.
Mount Holly is therefore best interpreted as network warfare. Griffin’s militia attacked the logic of dispersion more than it attacked a single fortress. Donop’s response concentrated strength around Mount Holly but weakened the immediate support available elsewhere. Bellum’s campaign map is designed to reveal this kind of relationship: locations are not isolated pins but nodes whose movement changes the strength and vulnerability of neighboring positions.
Evidence basis: American Battlefield Trust — Mount Holly / Iron Works Hill
The Famous “Widow of Mount Holly” Story Needs Proportion
Later accounts often emphasize a woman in Mount Holly who allegedly helped keep Donop occupied, turning a complicated campaign episode into a colorful anecdote. Ewald’s narrative is part of the source tradition, but the strategic situation cannot responsibly be reduced to romance. Donop also had military reasons for concentrating his brigade, dealing with Griffin’s force and resting troops during poor winter conditions.
Bellum keeps the anecdote in the source context rather than making it the causal centerpiece. The more defensible explanation combines militia pressure, Crown garrison dispersion, Donop’s decisions, weather, local conditions and Washington’s independent planning. A memorable story can illuminate how contemporaries interpreted failure, but it should not displace the operational evidence.
Evidence basis: American Battlefield Trust — Mount Holly / Iron Works Hill
Forces & Casualties — Evidence, Not False Precision
The charts only compare figures that share a source and measurement definition. Other source-defined figures remain in the evidence table.
| Metric | Side | Value | Definition / basis | Source | Confidence |
|---|---|---|---|---|---|
| Casualties | American | 200 | published modern estimate | American Battlefield Trust — Mount Holly / Iron Works Hill | Low |
| Casualties | Crown | 50 | published modern estimate | American Battlefield Trust — Mount Holly / Iron Works Hill | Low |
| Strength | American | 600 | forces engaged | American Battlefield Trust — Mount Holly / Iron Works Hill | Medium |
| Strength | Crown | 2,400 | Donop detachment / forces engaged | American Battlefield Trust — Mount Holly / Iron Works Hill | Medium |
Battlefield Analysis
Terrain
The action unfolded along roads, bridges, low settlements and the rising ground around Iron Works Hill. These features favored short delaying stands rather than a single fixed battlefield. The Americans could fire, fall back and force the Hessians to deploy repeatedly as they advanced.
Intelligence
Both sides operated with imperfect knowledge of enemy intentions. Griffin could not defeat Donop in open battle; Donop had to decide whether the militia activity represented a nuisance or a developing threat. That uncertainty is central to why the Hessian commander moved with substantial strength.
Turning point
The decisive operational development was Donop’s choice to continue toward and remain around Mount Holly after the militia withdrew. The ground changed hands, but the larger consequence was where his brigade was located when Washington struck Trenton.
Logistics
Donop’s detachment was part of an extended chain of Crown posts. Moving south concentrated his brigade locally but increased its distance from Trenton. Griffin’s much smaller force depended on mobility and local roads rather than on sustaining a conventional line of battle.
Weather
Winter weather and short December daylight affected campaigning across New Jersey. At Mount Holly, the more important environmental effect was the difficulty of moving and coordinating scattered forces over local roads while maintaining contact with distant garrisons.
Where Historical Sources Disagree
Mount Holly has unusually sharp source conflicts. Modern estimates list substantial casualties, while accounts attributed to Johann Ewald and Donop differ dramatically. Bellum treats those numbers as competing claims, not as values that can be reconciled by averaging. The battle’s strategic interpretation is also debated: diversion is clear, but the claim that Mount Holly alone made Trenton possible goes beyond the evidence.
Bellum does not average incompatible figures. Each number below retains its source, definition and confidence.
Battle Timeline & Tactical Phases
- 1
December 21
Militia pressure develops
Griffin’s small force operated against Crown outposts and presented a threat that Donop chose to answer with a much larger detachment.
Location: Burlington County approaches
Evidence confidence: High - 2
December 22–23
Donop advances south
The Hessian column moved through local roads and crossings, repeatedly deploying against American resistance.
Location: Road network toward Mount Holly
Evidence confidence: High - 3
December 23
Petticoat Bridge and intermediate stands
Small American parties fired and withdrew, trading space for time rather than attempting to defeat Donop in open battle.
Location: Petticoat Bridge / Slab Town corridor
Evidence confidence: High - 4
December 23
Iron Works Hill stand
Griffin’s men made another brief stand on rising ground before withdrawing as the Hessians pressed into Mount Holly.
Location: Iron Works Hill
Evidence confidence: High - 5
After the skirmishes
Donop remains at Mount Holly
The Crown force held the town while Washington prepared the Delaware crossing, creating the episode’s larger strategic significance.
Location: Mount Holly
Evidence confidence: Medium
Bellum Decision Explorer
This section evaluates decisions using information and constraints available at the time, not simply whether the eventual outcome was good or bad.
Pursue Griffin’s militia toward Mount Holly
Situation: Donop faced militia activity south of the Crown garrison line while the broader American army stood across the Delaware.
What was known: He could see a local threat but could not know Washington’s exact timetable for a cross-Delaware offensive against Trenton.
Alternatives: Ignore the militia; send a small screening force; or move a substantial detachment south to suppress it.
Constraints: Extended garrison spacing, uncertain militia strength, winter roads and the need to protect Crown control of central New Jersey.
Decision: Donop moved with a strong detachment toward Mount Holly and continued after Griffin’s men withdrew from successive positions.
Outcome: The Hessians won the local ground but remained away from Trenton during the immediate lead-up to Washington’s attack.
Hindsight guardrail: It is easy to call the move an obvious error after Trenton. The more useful analysis separates what Donop knew about Griffin from what historians know about Washington’s plan.
Claim-by-claim provenance
Source Agreement Matrix
This view separates broad source agreement from genuine disagreement. A conflict flag means the stored sources make materially different statements; it does not mean one source is automatically wrong.
1 independent source record in the ledger.
1 independent source record in the ledger.
1 independent source record in the ledger.
1 independent source record in the ledger.
1 independent source record in the ledger.
1 independent source record in the ledger.
Evidence Ledger & Source Trail
Published accounts contain sharply different casualty claims, so a single precise total is not secure.
Contemporary-derived casualty claims summarized in the modern study disagree sharply with the modern battle-facts estimate.
Samuel Griffin led the American militia and Carl von Donop commanded the Hessian force.
The Mount Holly actions unfolded from December 21 through December 23, 1776.
Iron Works Hill was the site of Griffin’s second and final stand as Donop pushed through Mount Holly.
The specialist battlefield interpretation separately identifies Iron Works Hill as the location of Griffin’s final stand during Donop’s advance.
American Battlefield Trust lists about 600 Americans and 2,400 Crown troops in the Mount Holly operation.
Donop’s detachment remained away from Trenton during the days before Washington’s December 26 attack.
Frequently Asked Questions
When was the Battle of Mount Holly?
The Mount Holly or Iron Works Hill actions unfolded from December 21 through December 23, 1776, only days before the Battle of Trenton.
Source basis: American Battlefield Trust — Mount Holly / Iron Works Hill
Who commanded at Mount Holly?
Colonel Samuel Griffin led the American militia force, while Hessian Colonel Carl von Donop commanded the much larger Crown detachment sent against it.
Source basis: American Battlefield Trust — Mount Holly / Iron Works Hill
Who won the Battle of Mount Holly?
Tactically, Donop’s Crown force drove Griffin’s militia from its positions and occupied Mount Holly. Strategically, the movement helped keep Donop’s detachment away from Trenton shortly before Washington attacked there.
Source basis: American Battlefield Trust — Mount Holly / Iron Works Hill
How many troops fought at Mount Holly?
American Battlefield Trust lists about 600 Americans and 2,400 Crown troops. These are modern forces-engaged estimates and should not be read as exact battlefield returns.
Source basis: American Battlefield Trust — Mount Holly / Iron Works Hill
Are Mount Holly casualty figures reliable?
They are disputed. Modern estimates and accounts associated with Ewald and Donop differ sharply, so Bellum preserves competing claims and does not average them into a synthetic total.
Source basis: American Battlefield Trust — Mount Holly / Iron Works Hill
Where is the Mount Holly battlefield today?
Iron Works Hill, associated with St. Andrews Cemetery, is an important interpreted anchor for Griffin’s final stand, but the full action extended along a broader corridor through Burlington County.
Source basis: American Battlefield Trust — Visit Iron Works Hill